Mastering Project Planning with Gantt Charts: A Practical Guide for Engineers
Introduction
Effective project planning is essential for delivering engineering work on time and to a high standard. One of the most powerful tools for achieving this is the Gantt chart—a clear, visual planning technique that helps engineers organise tasks, allocate resources, and track progress across a project’s timeline. By breaking work into manageable steps and showing dependencies between tasks, Gantt charts provide structure, improve communication, and keep complex engineering projects on schedule.
What is a Gantt Chart?
A Gantt chart is a Project Managing Tool, to help you organize your project in a work breakdown structure. It helps you create a schedule for your project and track the status of each task.
Gantt charts convey this information visually. They outline all of the tasks involved in a project, and their order shown against a timescale. This gives you an instant overview of a project, its associated tasks, and when these need to be finished.
A Gantt chart is a visual tool used to plan, organize, and track the progress of tasks in a project. It displays tasks as horizontal bars across a timeline, where the length of each bar represents the time required to complete that task.
There are many different tools and software that can be used to create a Gantt chart. ProjectLibre is a recognised, free, open source software which we recommend using for this module.
Key Features
A Gantt chart provides a timeline for tasks, breaking the project into smaller, manageable parts. It highlights task dependencies, tracks progress, and helps allocate resources effectively. Additionally, it serves as a communication tool for the team to understand goals and timelines.
Why Use a Gantt Chart in Engineering Design?
Gantt charts are especially useful for managing engineering design projects as they help visualize the entire project timeline, organize and prioritize tasks, and manage dependencies. They also track progress, allocate resources efficiently, and improve communication among team members.
How to Use a Gantt Chart
To effectively use a Gantt chart in a project:
- List All Tasks: Identify every task required to complete the project.
- Define Durations: Estimate how long each task will take.
- Establish Dependencies: Determine which tasks depend on others and their sequence.
- Set Milestones: Highlight significant points in the project, such as phase completions.
- Allocate Resources: Assign team members, materials, or equipment to each task.
- Update Regularly: Monitor progress and adjust the chart as necessary to reflect changes.
Let’s explore further how to create and manage a project management chart (Gantt chart). This can be done in 4 main steps:
Step 1: Identify Essential Tasks
Your project should be broken down into all the tasks that are needed to successfully complete the project.
The first thing you should do is to create a list of all these activities, and estimate how long each task will take.
Let’s use a simple example of making a cup of tea.
The tasks involved would be:
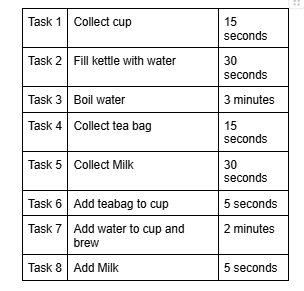
Step 2: Identify Task Relationships
Once you have the full list of tasks available, you should start to consider what order these tasks can be performed, and how long each task will take.
In almost all projects, there will be some tasks that can be done in parallel, there will be some task that cannot start until another task has started, and there will be some tasks that cannot start until another job is completed.
Let’s consider the cup of tea example above;
Tasks 1 and 2 can be done independently of each other. i.e. we do not need the kettle to be full before we can collect the cup (and vice versa).
However, Task 2 and Task 3 do have a relationship. That is, we cannot boil the water until we have completed filling the kettle.
Step 3: Input activities into software or a template
As per our example above, you can see that even a very simple task such as making a cup of tea has several steps, with several types of relationships involved. Now imagine scaling that up to a full engineering project, for example the development of a new Aircraft!
It is vital that all the major steps can be easily understood and visualised so that all tasks get completed in the right order and timescale. Don’t forget, any slip to the plan can incur extra costs, so good project management is critical to any project.
At this point, you should also consider any major project milestones (e.g. when is the prototype needed by? What is the promise date for final delivery? ). These milestones are added to the Gantt chart to show major points in the project.
Let’s continue with our cup of tea example: In this example, we have just 1 milestone. The tea should be ready for 7pm! The Gantt chart for this ‘project’ could look like this:
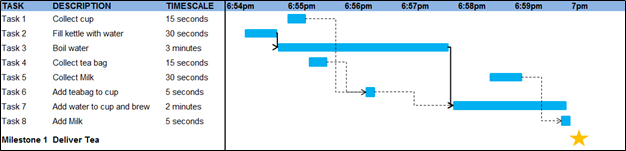
Notice how tasks 2, 3 and 7 (similar for tasks 4&6, and 5&8) are linked together. These tasks must take place in the correct order.
By visualizing the project in the chart above, we now know that we must start the project at 6:54pm in order to make sure the tea is ready for 7pm. If we start any later, it is impossible to hit our 7pm deadline and the project will overrun.
Step 4: Chart Progress
By displaying the project on a Gantt chart, it enables us to keep track of the actual status of the project. For example, each day you can see exactly what tasks should be taking place.
In the real world, quite often as a project moves along it may evolve and change. For example, the delivery of a part may be delayed, therefore you will need to delay the assembly which uses this part. Using the chart type above, it is easy to see what the knock-on effects are to other tasks.
During the lifecycle of the project, you should update your chart to reflect changes as soon as they occur. This will help you to keep your plans, your team, and your customers up to date.
Using a Gantt chart in this way ensures that the true, current status of the project is easily visible, and can be followed by a group of people so that everybody is working on the correct tasks at the correct time.
Interested in our Mechanical and Aerospace Engineering Courses?
At iLearn Engineering®, we offer a diverse range of online accredited engineering courses and qualifications to cater to different academic and career goals. Our engineering courses are available in varying credit values and levels, ranging from 40 credit Engineering Diplomas to a 360 credit International Graduate Diploma.
All Mechanical and Aerospace Engineering Courses
All Mechanical Engineering Diploma Courses are here.
All Aerospace Engineering Diploma Courses are here.
Short Courses (40 Credits)
A selection of our more popular 40 credit mechanical and aerospace engineering diplomas…
Diploma in Mechanical Engineering
Diploma in Aerospace Engineering
First Year of Undergraduate (Level 4 – 120 Credits)
Higher International Certificate in Engineering
Higher International Certificate in Mechanical Engineering
Higher International Certificate in Aerospace Engineering
First Two Years of Undergraduate (Level 5 – 240 Credits)
Higher International Diploma in Engineering
Higher International Diploma in Mechanical Engineering
Higher International Diploma in Aerospace Engineering
Degree Equivalent International Graduate Diploma (Level 6 – 360 Credits)
International Graduate Diploma in Engineering
International Graduate Diploma in Mechanical Engineering
International Graduate Diploma in Aerospace Engineering
Complete Engineering Course Catalogue (all courses)
Alternatively, you can view all our online engineering courses here.
Recent Posts
Civil Engineering Courses and Diplomas: Topics, Skills and Career Routes
Civil Engineering Courses and Diplomas: Topics, Skills and Career Routes Introduction Civil engineering is the backbone of modern society. From roads and bridges to skyscrapers and water systems, civil engineers design, build, and maintain the infrastructure that keeps the world running. If you’re considering a civil engineering course or diploma, understanding what it covers is […]
What Is a Diploma in Engineering? Courses, Levels and Career Routes Explained
What Is a Diploma in Engineering? Courses, Levels and Career Routes Explained Introduction Engineering shapes the world around us, from the buildings we live in to the technology we use every day. But for many aspiring engineers, the biggest question is not whether to pursue engineering, but how to start. Traditional university degrees are not […]
Engineering Courses: How to Choose the Right Route for Your Career
Engineering Courses: How to Choose the Right Route for Your Career Introduction Choosing an engineering course can feel like standing at the beginning of several different roads, each leading towards a different kind of future. One route may lead into mechanical systems and manufacturing. Another may lead towards aircraft, infrastructure, electronics, computing, renewable energy or […]